 Save
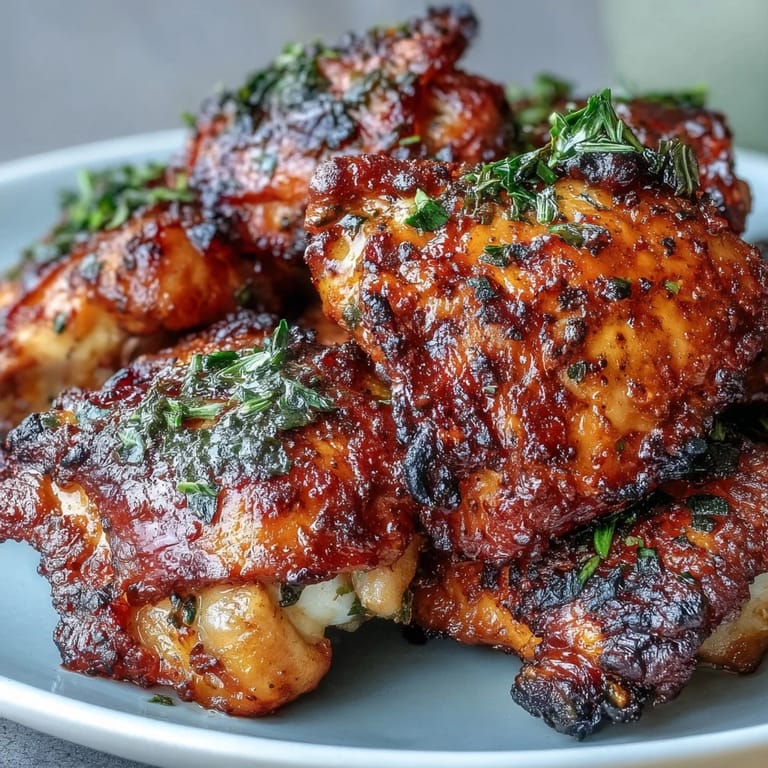
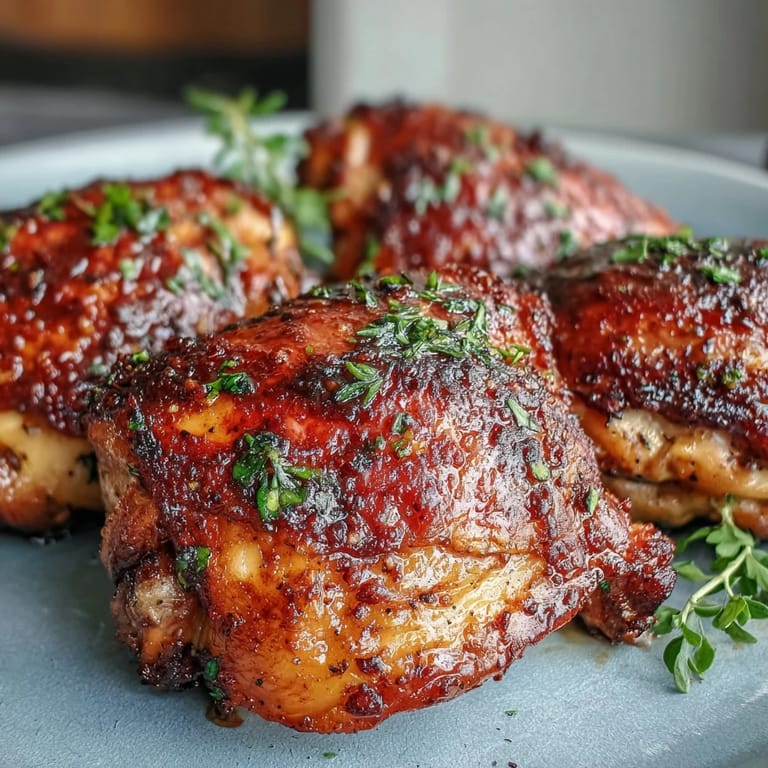
Save The sizzle that greeted me when I opened the oven door told me everything had gone right. I'd been chasing that perfect balance of crackling skin and tender meat for months, trying different temperatures and techniques. This time, the thighs glistened under the oven light, their edges curled and bronzed. The smell of smoked paprika and garlic had already filled the kitchen, and I knew before I even touched one that the skin would shatter under my fork. Sometimes you just know.
I made these for a small dinner party once, and my friend who claims to only eat chicken breast asked for the recipe before dessert even arrived. She kept turning a thigh over on her plate, marveling at how the skin held its crunch. I didn't mention that I'd almost panicked and pulled them out early, convinced they were taking too long. Patience paid off that night, and it taught me to trust the oven and the thermometer more than my nerves.
Ingredients
- Bone-in, skin-on chicken thighs: The bones keep the meat moist and flavorful, while the skin becomes your crispy reward if you dry it well before seasoning.
- Olive oil: Just enough to help the spices cling and encourage browning without making the skin soggy.
- Kosher salt: Seasons deeply and draws out moisture from the skin, which is the secret to crispness.
- Black pepper: Freshly ground adds a sharp bite that balances the sweetness of the paprika.
- Garlic powder: Toasted and concentrated, it gives a savory backbone without the risk of burnt fresh garlic.
- Onion powder: Adds a subtle sweetness and rounds out the garlic beautifully.
- Smoked paprika: This is where the magic happens, lending a deep, campfire-like flavor that makes people ask what your secret is.
- Dried thyme: Earthy and slightly floral, it brightens the rub without overpowering.
- Dried oregano: A hint of Mediterranean warmth that plays well with poultry.
- Dried rosemary: Crumbled fine so it doesn't poke anyone, it adds a piney, aromatic note.
- Baking powder: The undercover hero that raises the pH of the skin, helping it crisp faster and more thoroughly.
- Lemon wedges: A bright squeeze at the table cuts through the richness and wakes up every bite.
- Fresh parsley: A scatter of green makes the platter look alive and adds a whisper of freshness.
Tired of Takeout? 🥡
Get 10 meals you can make faster than delivery arrives. Seriously.
One email. No spam. Unsubscribe anytime.
Instructions
- Bring to Room Temperature:
- Pull the chicken out of the fridge about half an hour before you start. Cold chicken cooks unevenly, and this small step makes a real difference in how tender the meat turns out.
- Dry Thoroughly:
- Use paper towels to blot every surface, especially the skin. Moisture is the enemy of crispiness, and this step matters more than any seasoning trick.
- Preheat and Prep the Pan:
- Set your oven to 425°F and position the rack near the top. Line a baking sheet with foil and top it with a wire rack if you have one, which lets air circulate and crisps the underside too.
- Mix the Spice Blend:
- Combine all your spices and the baking powder in a small bowl, stirring well so the baking powder distributes evenly. This blend smells incredible before it even touches the chicken.
- Coat with Oil:
- Drizzle the thighs with olive oil and rub it in with your hands. You want a light, even coating that will help the spices stick and promote browning.
- Season Generously:
- Sprinkle the spice mixture over the chicken, concentrating on the skin side. Use your fingers to press it into every curve and crevice.
- Arrange on the Pan:
- Place the thighs skin-side up, leaving a little space between each piece so the heat can work its magic. Crowding leads to steaming, not crisping.
- Bake Until Golden:
- Slide the pan into the oven and set a timer for 35 minutes, but start checking at that point. You're looking for deep golden skin and an internal temperature between 175°F and 190°F in the thickest part.
- Broil for Extra Crunch:
- If the skin isn't as crispy as you'd like, switch to the broiler for 1 to 3 minutes. Stand nearby and watch, because the line between perfect and burnt is thin.
- Rest Before Serving:
- Let the thighs sit on the pan for 5 to 10 minutes. The juices redistribute, and the skin firms up even more as it cools slightly.
- Garnish and Serve:
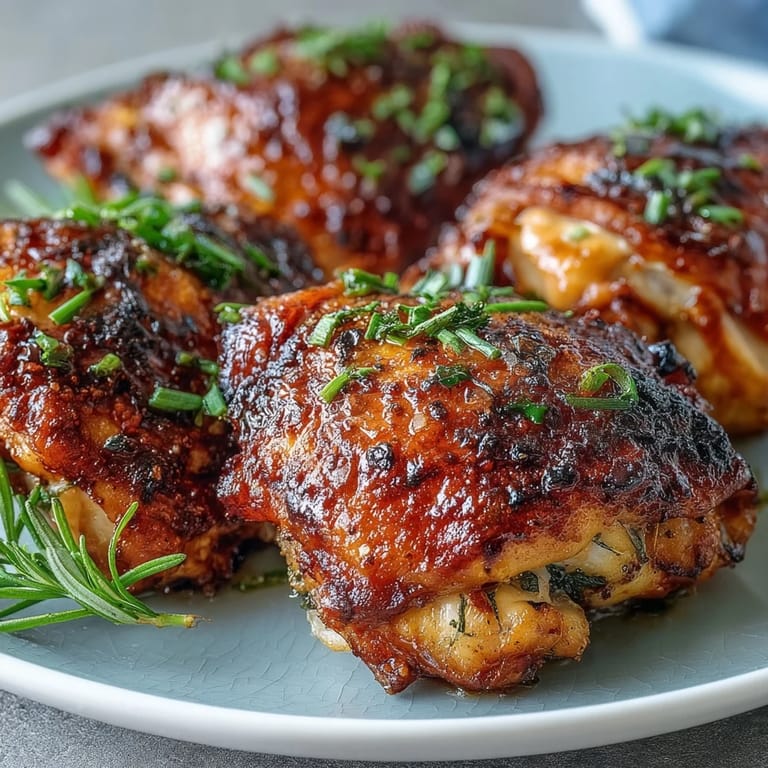
- Transfer to a platter, scatter parsley over the top if you like, and tuck lemon wedges around the edges. Serve hot and watch them disappear.
 Save
Save One Sunday, I made a double batch and packed the extras for my brother, who was working long shifts and living off takeout. He texted me a photo of the empty container two days later with just a thumbs-up emoji. That's when I realized this recipe had become more than dinner, it was a way to show up for people when words felt too small. Food has a way of doing that.
Getting the Crispiest Skin
If you have the time, salt the thighs and leave them uncovered on a rack in the fridge for up to 24 hours before you cook them. This dry-brining technique pulls moisture to the surface, which then evaporates, leaving the skin taut and primed to crisp. I started doing this after reading about it in a cookbook, and the difference is dramatic. The skin shatters when you bite into it, and the salt seasons the meat all the way through. Even a few hours helps, so don't stress if you can't plan a full day ahead.
Choosing Your Chicken
Bone-in, skin-on thighs are the star here because the bones conduct heat and keep the meat moist, while the skin protects and crisps. I've tried this with boneless thighs, and while they're faster, they lack the deep flavor and texture that bones provide. If you can, buy thighs that are similar in size so they cook evenly. I once grabbed a mix of small and large pieces and had to pull some out early while others kept going, which made serving a little chaotic. Consistency matters more than I expected.
Serving and Storing
These thighs pair beautifully with roasted vegetables, mashed potatoes, rice, or a crisp green salad. I love serving them with something that can soak up the savory drippings left on the pan. Leftovers keep in the fridge for up to four days, and I've found the best way to reheat them is in a 375°F oven or an air fryer for 8 to 10 minutes, which revives the crispy skin without drying out the meat. Cold chicken straight from the fridge also makes an excellent next-day lunch.
- Save the pan drippings and toss them with roasted potatoes or drizzle over grains for extra flavor.
- If you're feeding a crowd, double the recipe and use two pans, rotating them halfway through for even cooking.
- A meat thermometer is your best friend, it takes the guesswork out and guarantees juicy results every time.
 Save
Save This recipe has become my go-to whenever I want something reliable that feels special without demanding too much from me. I hope it brings you as many easy weeknight wins and happy plates as it's brought me.
Recipe FAQs
- → How do you get crispy skin on baked chicken thighs?
Pat the chicken very dry with paper towels before seasoning. Use a wire rack on the baking sheet to allow air circulation, and bake at 425°F. The baking powder in the spice blend helps draw moisture from the skin. Finish with 1-3 minutes under the broiler for extra crunch.
- → What temperature should bone-in chicken thighs be cooked to?
Dark meat is best cooked to an internal temperature of 175-190°F (80-88°C) in the thickest part. Unlike chicken breasts, thighs remain juicy even at higher temperatures. A meat thermometer ensures perfectly cooked, safe-to-eat meat.
- → Why use baking powder on chicken skin?
Baking powder alters the pH of the skin, helping it crisp up beautifully during roasting. It draws out moisture and promotes browning, creating that irresistible crackling texture without any funky taste.
- → Should you cover chicken thighs when baking?
No, bake uncovered the entire time. Covering creates steam and prevents crisping. Position the rack in the upper third of the oven and leave space between each thigh for optimal air flow and even browning.
- → How long should chicken rest after cooking?
Let the thighs rest for 5-10 minutes after removing from the oven. This allows juices to redistribute throughout the meat, ensuring each bite is succulent rather than dry. Serve directly from the baking sheet or transfer to a platter.
- → Can you prepare these thighs ahead of time?
Salt the thighs and refrigerate uncovered on a rack for up to 24 hours before baking—this drying time creates even crispier skin. You can also mix the spice blend in advance. Let chicken come to room temperature for 20-30 minutes before roasting.